As promised, I’m continuing my series on NLP (originally published in DOU), in the context of developing a dialogue system. The main goal is to describe my own experience with the NLU module and to analyze the existing Python libraries (Spacy, Stanza, Flair) for the high-quality and fast development of the NLU module.
Spacy
The Spacy library has proven to be an indispensable tool in the arsenal of many engineers and scientists and I’ve used it as the main pipeline on several NLP projects. The systems built with Spacy process hundreds of thousands of text documents a day, with many memory leak exceptions. From my own experience, I can say that its main advantages are speed, optimization of CPU and GPU, an extremely large community, and a simple and user-friendly interface, which I will reveal to you later with examples.
The figure below shows the main elements of the Spacy pipeline:

The first element in the pipeline is unstructured text. All you have to do is install Spacy and download the required language model. The list of available models can be found at this link.
!pip install spacy

!python -m spacy download en_core_web_lg
import spacy
nlp = spacy.load(“en_core_web_lg”)
text = (“When Sebastian Thrun started working on self-driving cars at Google in 2007, few people outside of the company took him seriously.I can tell you very senior CEOs of major American car companies would shake my hand and turn away because I wasn’t worth talking to, said Thrun, in an interview with Recode earlier this week.”)
doc = nlp(text)
Encoding our text into one of the English language models, we’ll immediately have access to all available Spacy NLU tools and you can start developing your own NLU module for the dialog system. One of the most revealing is the NER module, which will help find entities to recognize and fill the necessary slots for the recognition of intents.
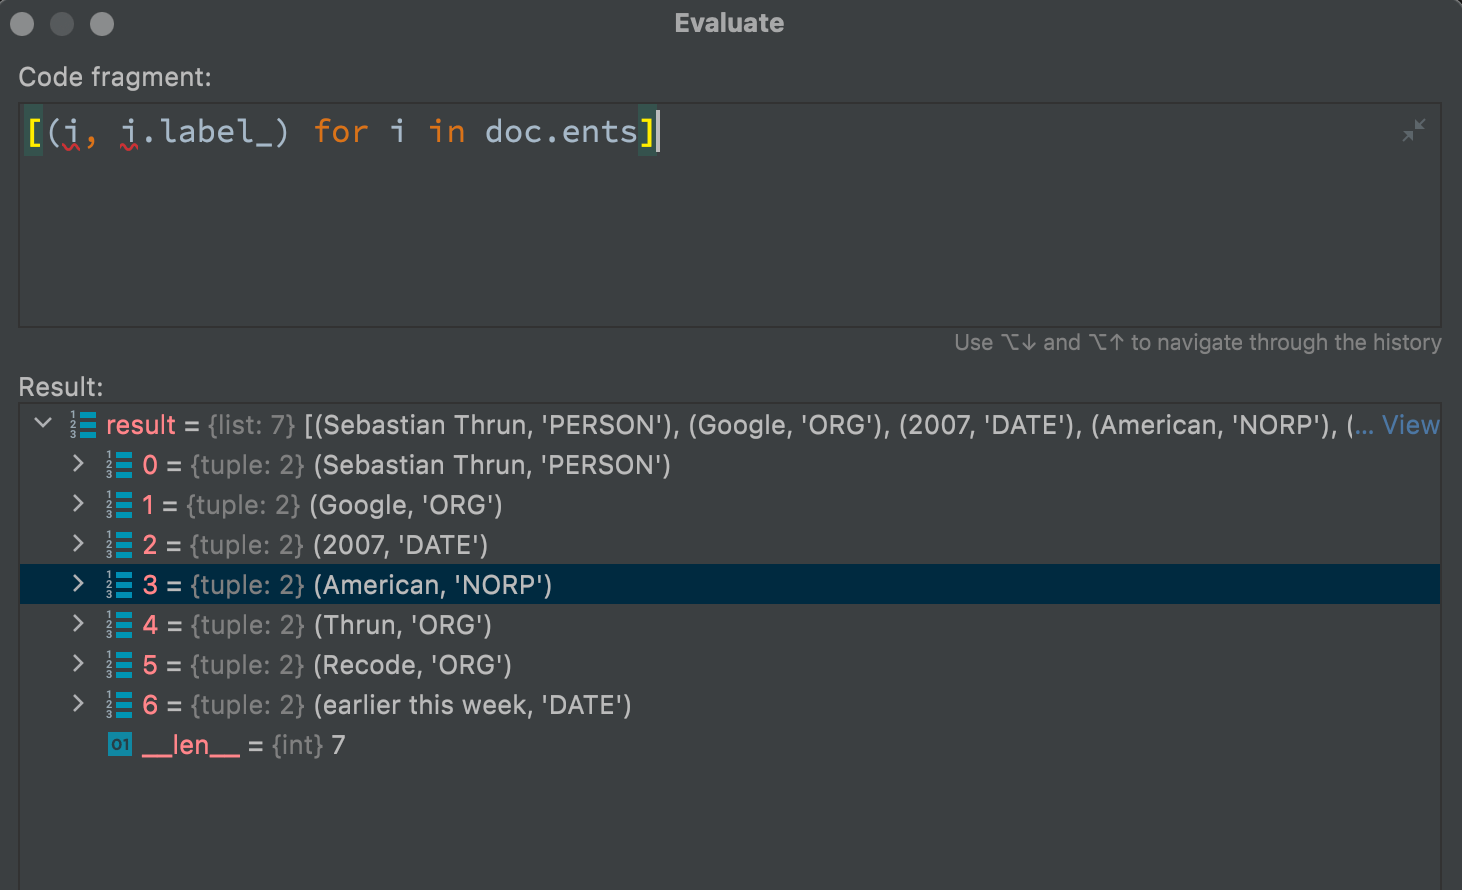
The example below shows what entities Spacy extracted from the text sample above. In my opinion, a pretty good result:

The code bar below lists all available entities for this language model.
nlp.pipe_labels['ner']

['CARDINAL', 'DATE', 'EVENT', 'FAC', 'GPE', 'LANGUAGE', 'LAW', 'LOC', 'MONEY', 'NORP', 'ORDINAL', 'ORG', 'PERCENT', 'PERSON', 'PRODUCT', 'QUANTITY', 'TIME', 'WORK_OF_ART']
Also, I want to pay attention to the functionality that will help determine the similarity of sentences or words with the help of vector space provided by Spacy out of the box.

doc1 = nlp("I like salty fries and hamburgers.")

doc2 = nlp("Fast food tastes very good.")
# Similarity of two documents
print(doc1, “<->”, doc2, doc1.similarity(doc2))
# Similarity of tokens and spans
french_fries = doc1[2:4]
burgers = doc1[5]
print(french_fries, “<->”, burgers, french_fries.similarity(burgers))

Discover the accuracy of each of the Spacy modules here. Also, it should be noted that Spacy allows you to deeply customize each of its elements of the pipeline, in particular the NER module. For example, it allows you to train your custom entities.
In general, I advise everyone to try Spacy and carefully explore all the properties of Spacy.doc, Spacy.span, and Spacy.token objects at https://spacy.io/api/doc.

Stanza
The next NLU library I’ll highlight is Stanza. In my opinion, Stanza and Spacy are quite similar in their philosophy and NLU capabilities.
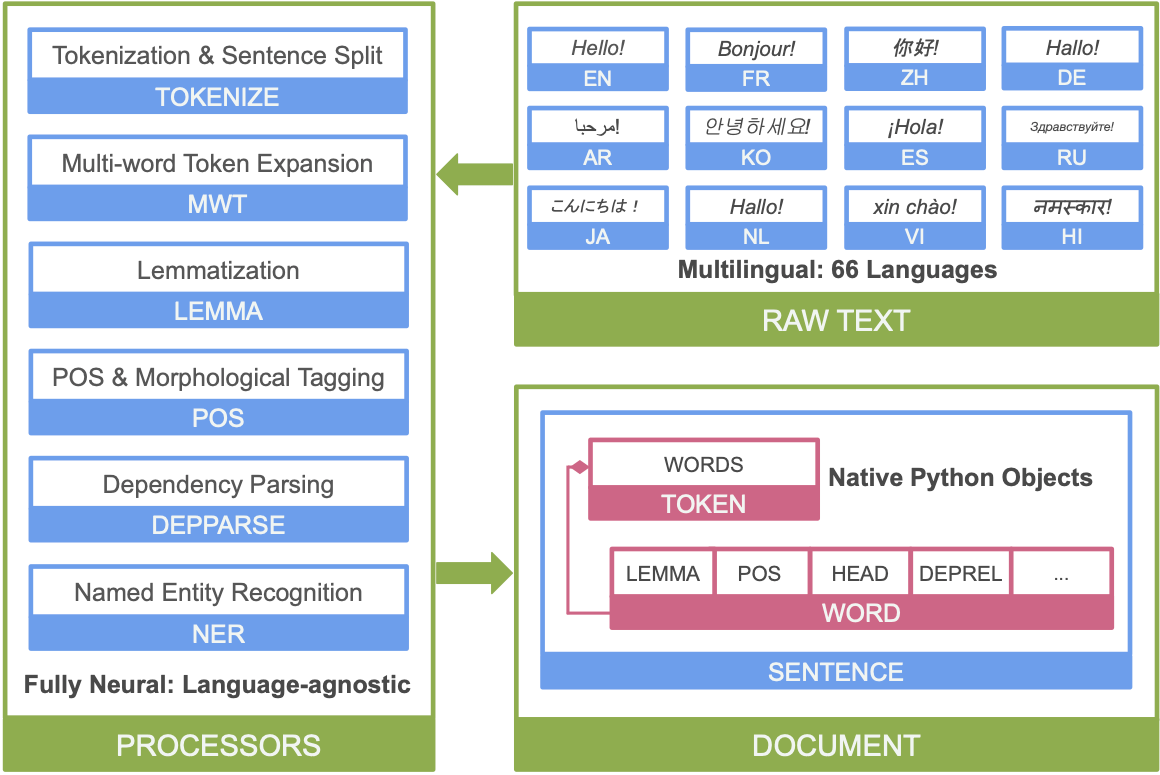
The image below shows the main elements of the Stanza pipeline:

One of the advantages of Stanza over Spacy is the much larger number of language models. In particular, Stanza includes the Ukrainian language, which personally makes me very happy and the Ukrainian language model recognizes and identifies entities quite easily. Let’s take a deeper look using the Ukrainian language to better understand what linguistic information Stanza provides us. For example, using the word “народився” (was born), you can see how rich the linguistic information is regarding each selected word from the example.
text = "Ян Бутельський народився у місті Львів"

import stanza

stanza.download('uk')

nlp = stanza.Pipeline('uk')

doc = nlp(text)

print(doc)

print(doc.entities)
{
“id”: 3,
“text”: “народився”,
“lemma”: “народитися”,
“upos”: “VERB”,
“xpos”: “Vmeis-sm”,
“feats”: “Aspect=Perf|Gender=Masc|Mood=Ind|Number=Sing|Tense=Past|VerbForm=Fin”,
“head”: 0,
“deprel”: “root”,
“start_char”: 15,
“end_char”: 24,
“ner”: “O”
},
[{
“text”: “Бутельський”,
“type”: “PERS”,
“start_char”: 3,
“end_char”: 14
}, {
“text”: “Львів”,
“type”: “LOC”,
“start_char”: 33,
“end_char”: 38
}]
“Ян Бутельський народився у місті Львів” – “Yan Butelskyy was born in Lviv city”
The examples above show how Stanza has become a pretty good alternative to Spacy for developing the NLU module. Deciding which one to choose is not obvious, so I advise everyone to try both and read the documentation in detail in the links above. From my own experience, I want to say that I use Spacy more actively simply because I like the website more.
Flair
Finally, to further broaden our horizons in the diversity of NLU libraries, we need to mention Flair. For me personally, it has become one of the best tools for developing classifiers based on Pytorch. Truth be told, Flair is an extremely comfortable and flexible wrapper around Pytorch. It allows you to use a wide range of language models from the box, which can be easily and quickly trained with your own data. You can choose to work with both recurrent networks and troformers, and in particular with BERT.
The code example below shows that the Flair interface is also very simple and straightforward. For example, we used the same text sample we used above for Spacy:
from flair.data import Sentence

from flair.models import SequenceTagger

# make a sentence

sentence = Sentence(text)
# load the NER tagger
tagger = SequenceTagger.load(‘ner’)
# run NER over sentence
tagger.predict(sentence)
print(sentence)
print(‘The following NER tags are found:’)
# iterate over entities and print
for entity in sentence.get_spans(‘ner’):
print(entity)
The following NER tags are found:
Span [2,3]: “Sebastian Thrun” [− Labels: PER (0.9996)]
Span [10]: “Google” [− Labels: ORG (0.9988)]
Span [31]: “American” [− Labels: MISC (0.9965)]
Span [50]: “Thrun” [− Labels: PER (0.9999)]
Span [56]: “Recode” [− Labels: ORG (0.9848)]
So the result is not quite as good as Spacy, but an interesting feature that appears is the model’s confidence in each entity. In the meantime, one of the undeniable advantages of Spacy over Flair’s performance is Spacy’s 3 to 5 bigger speed when making tagger.predict.
Next I’ll focus on the Flair model’s pipeline workout. Let’s choose a training environment. This can be done locally on the CPU and GPU but from my own experience, Pytorch prefers the GPU. The best choice is a cloud service like this. This is a very convenient application – fast, all-in-one, stored in the cloud, and you can practically train from the phone’s browser. Just give it a try!
The example below depicts the main steps of the training process:

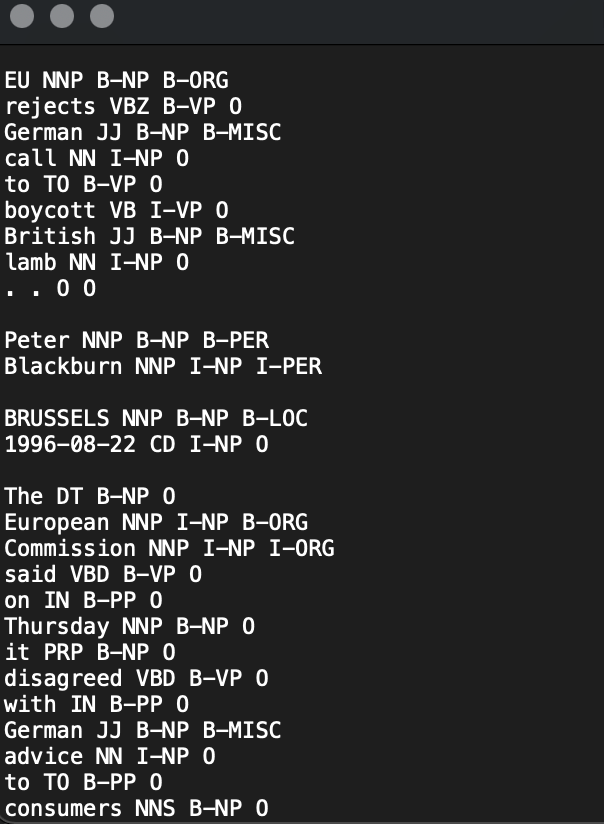
Data labeling is a very long and troublesome process because it depends on the quality of the future model. The description of the labeling process deserves a separate publication, so I will not dwell on it in detail. I will just say that the classic approach is so BIO abstract, a little more detail is described in my previous post “An Introduction to NLP.“ The example uses pre-marked data and its main feature is that each word-talk is marked with the required label specified on a new line and each new sentence is separated with \ n.
So our future model will try to classify each token with the appropriate label to determine the beginning and end of the essence and sentence. From the example below, it’s easy to understand pipeline processes such as using ready-made word embeddings, which Flair allows you to combine. But keep in mind that this can increase your training time. For instance, take the LSTM model with fairly standard parameters. After waiting 30-40 minutes, if it’s Colab, we get our model.
from flair.datasets import ColumnCorpus

from flair.embeddings import WordEmbeddings, FlairEmbeddings, StackedEmbeddings

from flair.models import SequenceTagger

from flair.trainers import ModelTrainer
# 1. get the corpus
columns = {0: “text”, 1: “pos”, 2: “np”, 3: “ner”}
data_folder = ‘/content/drive/MyDrive/conll2003′
corpus = ColumnCorpus(data_folder,
columns, train_file=’/content/drive/MyDrive/conll2003/train.txt’, test_file=’/content/drive/MyDrive/conll2003/test.txt’)
print(corpus)
# 2. What label do we want to predict?
label_type = ‘ner’
# 3. make the label dictionary from the corpus
label_dict = corpus.make_label_dictionary(label_type=label_type)
print(label_dict)
# 4. initialize embedding stack with Flair and GloVe
embedding_types = [
WordEmbeddings(‘glove’),
FlairEmbeddings(‘news-forward’),
FlairEmbeddings(‘news-backward’),
]
embeddings = StackedEmbeddings(embeddings=embedding_types)
# 5. initialize sequence tagger
tagger = SequenceTagger(hidden_size=256,
embeddings=embeddings,
tag_dictionary=label_dict,
tag_type=label_type,
use_crf=True)
# 6. initialize trainer
trainer = ModelTrainer(tagger, corpus)
# 7. start training
trainer.train(‘resources/taggers/sota-ner-flair’,
learning_rate=0.1,
mini_batch_size=32,
max_epochs=5,
embeddings_storage_mode=”GPU”)
In my opinion, the result is quite good. If you did everything right, F1 will be more than 96%.
I am Yan Buteslkyy I work for New Fire Partners company .
Wrapping Up
We got acquainted with one of the elements of the Pipeline dialog system that is responsible for understanding Natural Language. The selected examples of libraries have been used by me personally, so I can guarantee their reliability and efficiency. Each of them underwent a baptism of fire in the production. I also hope that I fulfilled the wishes of readers in the comments, who asked for more examples of real implementation. I hope that in the end, she will be able to answer the phrase “Glory to Ukraine!”